
Unveiling the iPhone 17 Pro: A Teardown with Surprises
Imagine a world where a smartphone, celebrated as the pinnacle of design and innovation, reveals unexpected vulnerabilities upon closer inspection, sparking curiosity among tech enthusiasts and everyday users alike. At Apple’s ‘Awe Dropping’ event on September 9, the iPhone 17 Pro was unveiled with a striking redesign, promising cutting-edge features and performance. Yet, beneath its sleek exterior, questions about durability and repairability have surfaced. The gadget repair experts at iFixit have conducted a comprehensive teardown of this flagship device, providing an in-depth video that uncovers its internal architecture, including an innovative vapor chamber for thermal management.
This teardown is more than just a peek inside; it serves as a critical lens into how Apple’s latest creation holds up under scrutiny in a landscape where repairability is increasingly vital. As smartphones become integral to daily life, understanding a device’s ease of repair can influence purchasing decisions and long-term satisfaction. The iFixit analysis not only highlights the engineering marvels within the iPhone 17 Pro but also teases a brewing controversy dubbed ‘Scratchgate,’ which could redefine perceptions of this premium device.
The significance of such explorations cannot be overstated, as they empower consumers with knowledge about the products they invest in. By dissecting the iPhone 17 Pro, iFixit sheds light on both the advancements and potential pitfalls of Apple’s design choices. This guide aims to walk through the teardown findings, offering a clear path to understanding the device’s inner workings and the emerging issues that might affect user experience.
Why Repairability Matters for Apple’s Latest Flagship
In an era where smartphones are both essential tools and significant investments, the ability to repair a device plays a pivotal role in its overall value. The iPhone 17 Pro, as Apple’s flagship offering, sets a benchmark for design and functionality, but its repairability directly impacts how long it remains a reliable companion for users. With environmental concerns and consumer rights gaining traction, the push for sustainable and repair-friendly technology has never been stronger, making such evaluations crucial.
Apple’s approach to device construction has evolved over the years, with the iPhone 17 Pro reflecting a blend of innovation and complexity compared to earlier models. Unlike the recently introduced iPhone Air, which offers slightly more accessible repair options, the Pro model introduces new challenges with its unibody design and intricate internal layout. These design shifts highlight a tension between aesthetic appeal and practical maintenance, a balance that Apple continues to navigate under public scrutiny.
Beyond individual user benefits, repairability ties into the broader right-to-repair movement, advocating for accessible fixes and reduced electronic waste. For tech enthusiasts and casual users alike, iFixit’s findings provide essential insights into whether the iPhone 17 Pro supports or hinders these goals. Understanding these aspects ensures that consumers can make informed choices, weighing the allure of cutting-edge technology against the practicalities of long-term ownership and care.
Inside the iPhone 17 Pro: Step-by-Step Teardown Insights
Delving into the iPhone 17 Pro through a meticulous teardown process reveals both the marvels and challenges of its design. iFixit’s detailed examination offers a window into the device’s core, breaking down each stage of disassembly with precision. This section provides a step-by-step guide to understanding how the device comes apart and what lies within.
Step 1: Removing the Bottom Torx Screws
The teardown begins with the removal of two Torx screws located at the base of the iPhone 17 Pro, a familiar starting point for most iPhone disassemblies. These screws secure the device’s outer casing and must be carefully extracted to avoid damage. This initial step sets the stage for accessing the internals, requiring precision to ensure a smooth process.
Tool Tip: Choosing the Right Screwdriver
Selecting the appropriate Torx screwdriver is paramount to prevent stripping the screws, which could complicate further disassembly. A mismatched or low-quality tool might damage the screw heads, leading to frustrating delays. Investing in a compatible, high-quality screwdriver ensures this first hurdle is cleared without issue.
Step 2: Accessing the Back Glass Panel
Once the screws are removed, the next task involves prying off the back glass using suction cups to lift the panel. This step reveals the iPhone 17 Pro’s new unibody design, featuring a smaller removable glass section rather than the full back panel seen in previous models. This limited access point is a critical design change to note during repairs.
Design Shift: Limited Access Challenges
The reduced area of removable back glass introduces notable challenges for repair tasks compared to earlier iPhone iterations. While it may enhance structural integrity, this shift restricts direct access to internal components like the battery. Repair technicians and DIY enthusiasts must adapt to this constraint, often requiring additional steps to reach key areas.
Step 3: Screen Removal for Major Repairs
For most significant repairs, removing the screen of the iPhone 17 Pro becomes necessary to access the internal components. This process involves carefully detaching the display to expose the underlying hardware. It’s a critical juncture in the teardown, as many repairs cannot proceed without completing this step.
Caution: Handling Fragile Components
Extreme care must be taken during screen removal due to the delicate nature of the display and its attached ribbon connectors. Mishandling can result in cracked screens or torn cables, escalating repair costs and complexity. Patience and steady hands are essential to navigate this phase without causing unintended damage.
Step 4: Battery Removal with Electrically-Debonding Adhesive
Removing the battery involves a unique challenge, as it is secured with an electrically-debonding adhesive that requires a 12V current to release. Once the current is applied, the adhesive loosens, allowing the battery and its protective plate to be separated. This innovative approach marks a significant shift in Apple’s design strategy for battery replacement.
Innovation Insight: Pros and Cons of Adhesive Tech
While the electrically-debonding adhesive offers the advantage of easier battery swaps by reducing physical strain, it comes with the drawback of requiring specialized equipment. Not all repair shops or individuals may have access to the necessary tools, potentially limiting who can perform this task. This technology represents a double-edged sword, balancing convenience with accessibility concerns.
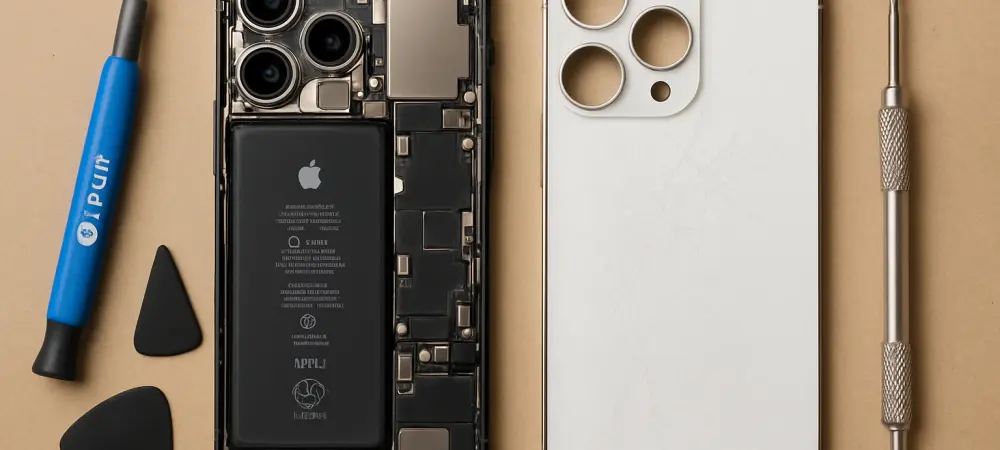
Step 5: Examining Internal Layout and Vapor Chamber
With major components exposed, the teardown reveals the internal layout, including the logic board, Taptic Engine, and a novel vapor chamber for heat dissipation. Positioned strategically, these elements showcase Apple’s focus on performance and thermal management. This stage provides a deeper look into the engineering behind the device’s capabilities.
Tech Highlight: How the Vapor Chamber Works
The vapor chamber features a lattice structure designed to efficiently manage heat, with its upper section cooling the A19 Pro chip and the lower part addressing battery heat. By distributing thermal energy away from critical components, this system aims to enhance device longevity and performance during intensive tasks. Its implementation marks a notable advancement in smartphone cooling technology.
Step 6: Uncovering the USB-C Port and Sensors
Accessing the USB-C port requires removing a staggering 22 screws, while replacing front sensors and rear camera cables proves relatively straightforward. This disparity in complexity highlights varied design considerations across different components. Each removal step offers unique insights into the device’s construction and repair challenges.
Repair Hurdle: Multiple Screw Types
A significant frustration during this process is the need for multiple screwdriver types, including tri-point, Phillips, and standoff, to handle various screws. This diversity complicates repairs, as technicians must juggle different tools to progress. Such design choices can deter DIY repairs and increase reliance on professional services.
Key Findings from the iPhone 17 Pro Teardown
The teardown of the iPhone 17 Pro yields several critical observations about its design and repairability. These insights are summarized below for quick reference and clarity:
- The new unibody design significantly limits back glass access, making certain repairs more complex than in prior models.
- Battery replacement shows potential for simplicity with a protective plate, though it demands specialized tools for adhesive debonding.
- The innovative vapor chamber offers improved thermal management, a boon for performance under heavy use.
- The use of multiple screw types and the absence of a dual-entry design detract from overall repair ease.
- A repairability score of 7 out of 10 places it slightly below the iPhone Air, reflecting a mixed outcome for DIY enthusiasts.
Decoding Scratchgate: What’s Behind the Scratches?
A surprising issue dubbed ‘Scratchgate’ has emerged with the iPhone 17 Pro, particularly around the camera plateau, where the device exhibits an unusual tendency to scratch easily. Reports and user experiences have highlighted this vulnerability, raising concerns about the durability of Apple’s latest flagship. iFixit’s teardown delves into this problem, offering a detailed analysis of the root cause behind these surface imperfections.
Microscopic examination by the repair team uncovered that the anodized layer around the camera island is prone to spalling, a process where the brittle coating flakes away rather than exposing raw aluminum underneath. This design flaw, tied to the specific anodization process, compromises the aesthetic and structural integrity of the affected areas. Such findings question the robustness of materials chosen for high-wear regions of the device.
The implications of Scratchgate extend beyond mere appearance, potentially affecting user confidence in the iPhone 17 Pro’s premium build quality and Apple’s reputation for durability. As discussions swirl around possible remedies, speculation arises about whether future iterations, such as rumored models in the coming years, might address this through revised materials or design tweaks. For now, users must remain cautious with handling to minimize visible damage until a permanent solution emerges.
Conclusion: Navigating Repairs and Reflecting on Design Flaws
The teardown journey through the iPhone 17 Pro by iFixit unveiled a device of remarkable innovation paired with notable challenges, from the intricate battery removal process to the introduction of a sophisticated vapor chamber. Each step of the disassembly highlighted Apple’s evolving design philosophy, often balancing cutting-edge technology with repair complexities. The process also brought to light the Scratchgate issue, casting a shadow over an otherwise impressive flagship.
Looking back, the mixed repairability score of 7 out of 10 served as a reminder that while advancements were made, barriers remained for those seeking to maintain their devices independently. As a next step, users and technicians were encouraged to explore visual resources like detailed teardown videos for hands-on guidance. Staying updated on Apple’s response to surface durability concerns became essential, ensuring informed decisions about protection methods or potential recalls in the future. This exploration ultimately equipped consumers with the knowledge to navigate both the marvels and pitfalls of modern smartphone design.